
Some machines (like Terminal Servers), experience logons and logoffs of numerous users each day. Many of these users can be logged on simultaneously. Sometimes it is important to easily track user logon & logoff activity.
Overview
In this tutorial we will automate the collection of user login and logout data into a text file and send a daily email to the system administrator for user activity review. For these purposes we will use two separate Tasks. One Task will detect user logon & logoff activity and write it into a text file. Another Task will send an email at a specified time of the day (e.g., at 4:30 AM) with the contents of the user login history file as message text.
How to save Windows user login history? We will need a Task that employs the User Logon & Logoff Trigger to detect both user logons and user logoffs and performs the Write to File Action to log both username and the time of logon and logoff.
Create a Task
How to create a Task? Every Task in Automation Workshop is created by using Task Wizard. Open Automation Workshop and click New Task in the File menu. Alternatively, right-click in the Task Pane or press the keyboard shortcut CTRL+N while the Automation Workshop window is active. This will start the Task Wizard.
Monitor logon
How to add and configure the User Logon & Logoff Trigger? The User Logon & Logoff Trigger can detect either the logon or logoff of a particular user or any user. Since the User Logon & Logoff Trigger can detect only either a logon or a logoff at a time, we will have to use two User Logon & Logoff Triggers for the current Task. The first one will watch the system for Windows user logon, while the second one will monitor for user logoff.
Once in Task Wizard, read the introductory screen and click the Next button to go to the Trigger tab. Click the Add button (this will open the Add Trigger window), and choose the User Logon & Logoff Trigger from the list and click OK. As we can see, the default settings are to trigger the Task when any user: logs in. Since that is exactly what we need, just click OK.
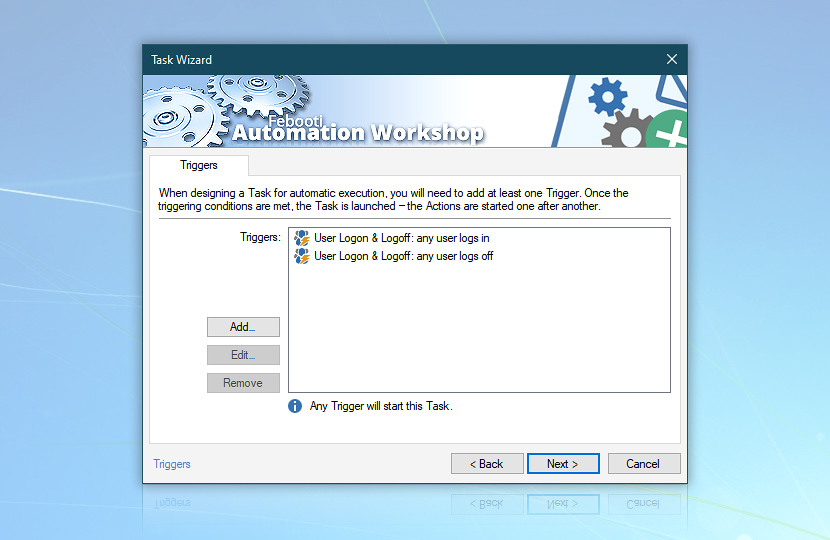
Now, click the Add button again and add another User Logon & Logoff Trigger. Only this time configure the Trigger to execute the Task when any user: logs off. Click OK and see that the Triggers list now contains two User Logon & Logoff Triggers, one watching for user logons and the other for user logoffs.
Configured this way, the Task will be triggered every time a user logs on or off. Now let us see how to write user logon & logoff data into a text file. Click the Next button in Task Wizard to go to the Actions tab.
Save login history
How to add and configure the Write to File Action to save user login history? Once in the Actions tab, click the Add button (this will open the Add Action window) to open the list of all available Automation Workshop Actions. We will use the Write to File Action from the File & Folder category to save the data gathered by either of the used User Logon & Logoff Triggers into a text file.
First, we need to specify location and name of the file into which the user logon & logoff data will be saved. We will save daily user logon history into a file in C:\User Login History\ folder with a name that includes the current date. Click the Browse button and browse to C:\User Login History\ (create if necessary), type in a file name, such as login history.txt and click the Open button.
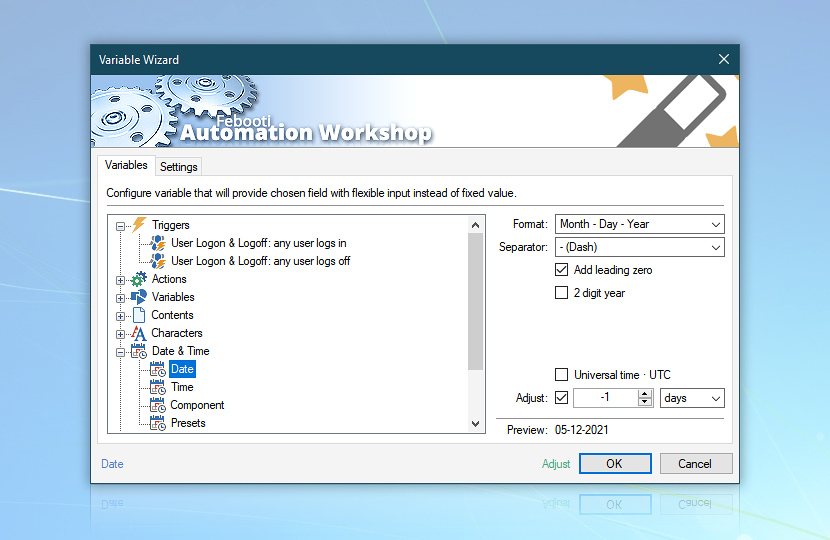
The File input line now should contain C:\User Login History\ parameter. In order to add the current date to file name, put the cursor exactly between history and .txt, enter a space character and click the Variable Wizard button.
We need to choose the Date variable from Date & Time category. Since we need to use date in file name, we should choose a format that contains only characters allowed in a file name. Also, sorting files should be easy. That is why let us choose the Year / Month / Day format and specify - (dash) as the separator character. Mark the Add leading zero checkbox as well.

That would suffice for returning the current date value and writing data to an accordingly named file. Let us assume that there are users working late at night (as late as almost 4 AM in the morning). In this example we will send all user logon & logoff data occurring up until 4:00 AM the next morning as the data of the previous day. To do this, let us adjust the date appropriately by 4 hours. Mark the Adjust checkbox and set the adjustment for -4 hours.
This way, every logon and logoff occurrences will be written into a file covering the period from 4:00 AM till 4:00 AM next day. Or, the other way around, every login before 4:00 AM will be attributed to the previous day. Click OK and see that the File input line now contains C:\User Login History\ parameter.
Examples of automatically generated file names according to Task execution date:
- login history 2020-01-06.txt (January 6th, 2020)
- login history 2021-12-21.txt (December 21st, 2021)
- login history 2022-05-29.txt (May 29th, 2022)
Now, let us specify what data to write into the file. We needed to log the time of logon and logoff, whether it was logon or logoff, as well as the username itself. Since logon and logoff are detected by separate respective Triggers, we will have to specify dynamic variables from both. The Trigger that is not activated will return an empty string, while the active Trigger will provide the necessary data.
Let us start adding dynamic variables to the Text to write field of Write to File Action. First, let us add the time of logon and logoff operation. Click the Variable Wizard button and choose Time from Date & Time category. You can keep it as is or convert to 24 hour time format without adding am/pm by marking the respective checkboxes. Click OK.
When Time value has been added to Text to write field, add a space character and click the Variable Wizard button again. Now we will add text that indicates whether the user has just logged on or, on the contrary, logged off. Once in Variable Wizard, locate the Triggers category and select the first Trigger, namely User Logon & Logoff: any user logs in, and choose the Logon or logoff event parameter on the right.
Click OK and (without adding a space) click the Variable Wizard button again. Repeat the procedure with the second Trigger, namely, set User Logon & Logoff: any user logs off to return its Logon or logoff event parameter and click OK.

Now we see EventEvent as two dynamic variables together. When one of the two Triggers executes the Task (upon either logon or logoff), only the active one will have the data to return. The Event dynamic variable of the other one will return nothing (will be effectively ignored). Now we should add a username variable that will tell exactly which user was logging into the system or logging out of it.
Multi-trigger note
You can always use the built-in multi-triggering feature that enables you to effortlessly access variables from multiple Triggers of the same kind with a single variable.
Not unlike with Event parameter which we had to use twice—once per each Trigger, we will also require the involved username from both Triggers. Insert a space character after both Event parameters and click the Variable Wizard button. Locate the first Trigger and choose Domain\username value. Click OK. Open the Variable Wizard once more and choose the Domain\username value from the second Trigger. Click OK.
By this point, Text to Write input contains already five parameters. As explained, only three of them will be used during each Task execution. Input an Enter character (line break) at the end of the line. Each time the Task will be executed, it will add a new line to the user login history file (instead of adding more data at the end of the previous line).
Since we need to gather all user logon & logoff data and keep it at least until sending it over email, it is necessary to specify that new data will be appended at the end of the file instead of overwriting the previous contents. Set this in the Options tab of Write to File Action. The Action has been configured. Click OK to save its parameters and return to the Task Wizard.
Run As
Once back in the Actions tab click Next to go to Run As settings. It is a good idea to choose that the Task will be run as the Service user (SYSTEM) regardless of whether a user is logged in.
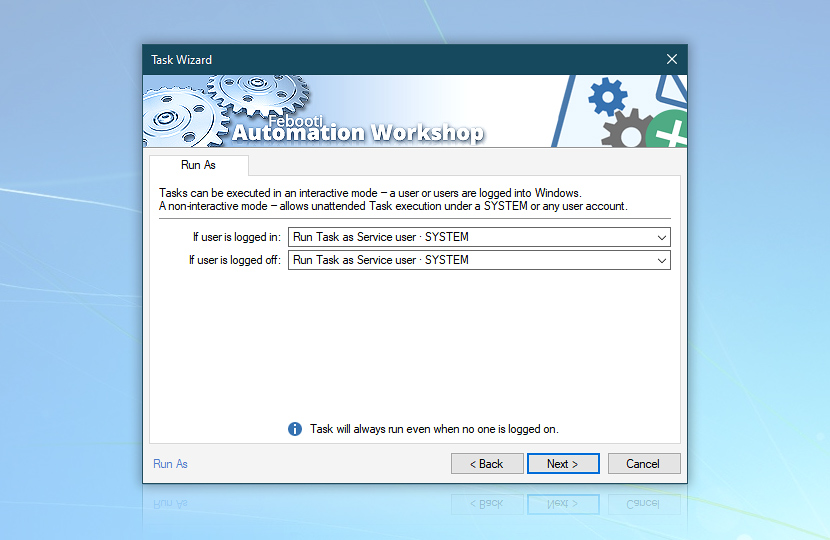
Since the status of currently logged in user can change according to multiple logons or logoffs of various users (and folder access rights can vary accordingly), it is better to run the Task from an account with fixed and granted access rights.
Reports
Click Next and configure necessary email reports in the Reports tab. Probably, there is no need to send an email upon each successful completion since the very idea of this Task is to summarize user daily activity. Click Next and in the Task tab provide the Task with a recognizable name and, optionally, also a description.
Click Next to go to the Finish tab. However, instead of clicking the Finish button we will need to configure advanced options. Click the Advanced button to save the Task and enter its properties. Go directly to the Settings tab and pay attention to the If an instance of already running (or queued) task is being executed parameter that by default is set to Run task in parallel.
If multiple logons and logoffs will randomly happen simultaneously, in this scenario multiple parallel instances of the Task will try to access the login history.txt file and write data into it. This may lead to a file access violation and the inability of some instances of the Task to write the data.
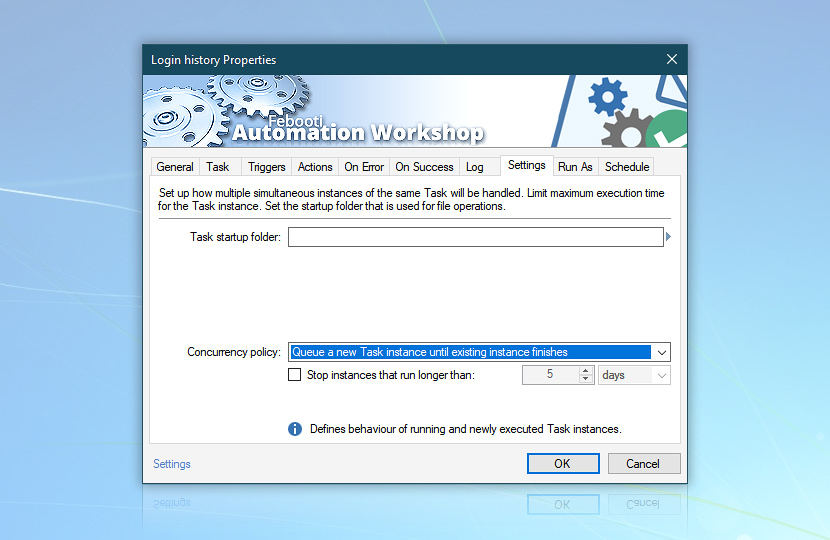
That is why we need to set the instances parameter to Queue a new task instance until existing task finishes. In this case the Task will wait until the previous instance has finished (guaranteeing that file is accessible again) and only then write logon or logoff data. Click OK. The Task is now fully configured and active!
Send email
How to create a Task to send an email periodically? We have created the first Task which will gather user logon & logoff data into a daily text file. Now we need to create another Task which will send this text file to a specified email address. A separate Task is needed because its initiation requires a different set of criteria (while the first Task is executed every time a user logs into or out of the system, the email is only sent once a day, regardless of user activity).
First, we will add the Task Scheduler Trigger which will execute the Task at 4:30 AM on a daily basis. Second, the Send Email Action will be added and configured in order to deliver the necessary file to the system administrator.
How to schedule the Task daily? Once more, choose New Task from the File menu to open the Task Wizard. In the Triggers tab of Task Wizard click the Add button and choose the Task Scheduler Action from the list to open its properties. Since the logon and logoff data are collected until 4:00 AM each day, it is reasonable that the Task is scheduled to be executed somewhat after that time, say, 4:30 AM on a daily basis.
Since there is no need to use exclude particular days, weekdays, or months, or limit the scheduling to a particular time period, the default options are already set to what is needed for daily Task execution. Just click OK to return to the Task Wizard. Click Next to go to the Actions tab.
Get logon history
How to use the Read from File Action to get file contents? Since the Task that writes user logon data into the text file uses the Date variable as part of the filename specification (i.e., C:\User Login History\), we will need to use the Read from File Action in order to retrieve data from a file in the name of which a variable is used.
![Read from File: login history [Date].txt](https://i.febooti.com/i/automation-workshop/tutorials/read-file-login-history-date.jpg)
Click the Add button and open the Read from File Action in the File & Folder category. In the File input we will have to replicate the parameter used in the Write to File Action contained in the Task created previously. Namely, the Read from File Action has to read the contents of theC:\User Login History\ file.
Enter C:\User Login History\ into the File input, put a space character between history and .txt and click the Variable Wizard button. Like in Write to File Action, we need to choose the Date variable from the Date & Time category. Choose the Year / Month / Day, specify - (dash) as the separator character and mark the Add leading zero checkbox. This way the parameter used in Write to File Action is fully copied and will return the file name in exactly the same format.
There is one difference, namely, the Adjust parameter. In Write to File Action we used -4 hours value to specify that logon data have to include all login and logout occurrences with a 4-hour shift or, in other words, until 4 AM the next day. However, in this Task we will send the file created during the previous day which means that the adjustment has to be set to a -24 hours (or similarly -1 day) value. Set the Adjust parameter and click OK.
Notice the C:\User Login History\ value in the File input. Click OK to return to the Actions tab of the Task Wizard.
How to send daily email with Windows user login history? Click the Add button again, choose the Send Email Action from the Email category, and click OK to open its properties. The Email tab contains email settings. Fill in the From, To and Subject fields with appropriate sender's and recipient's addresses as well as the relevant subject text, respectively.

The Email text field will be filled with the contents of the user login history. In order to do so, we must access the contents of C:\User Login History\ as read by the Read from File Action in the previous step. Put the cursor into the Email text field and click the Variable Wizard button to open the list of all available variables. Choose Read from File: [Variable] from the Actions category. It already contains the login history of the previous day. Leave File content as the variable specification and click OK to return to the Send Email Action properties.
If all other settings of the Send Email Action are properly configured, click OK to save the settings and return to the Actions tab.
Finalizing the Task
Click Next to go to the Run As tab. Like with the previous Task, you can use Service user for both situations, namely, when a user is logged in or logged off.
Click Next again to configure email reports. Since an email is already sent upon successful Task execution, we can disable the Send email upon successful completion checkbox or leave it enabled, if necessary. Click Next to go to the Task tab where the Task can be given a name and description. Proceed to the Finish tab to save and activate the Task by clicking the Finish button.
Conclusion
We have just created two Tasks. The first Task provides data that is used by the second one.
The first Task uses two User Logon & Logoff Triggers. One Trigger is configured to detect all user logons. Another Trigger monitors for all user logoffs. When either logon or logoff of a user is detected, the respective Trigger executes the Task that performs the Write to File Action, which writes the time of either logon or logoff as well as username into a text file containing the current date in its name. The time, event type and username is retrieved from the respective User Logon & Logoff Trigger by using the Variable Wizard.
The second Task uses Task Scheduler Trigger for daily execution at 4:30 AM. When started, the Task performs the Read from File Action to read the login history Date.txt file (with data gathered on the previous day). When user login history data have been read, the Task performs the Send Email Action, which uses a Variable Wizard dynamic value to retrieve data from the Read from File Action and sends it as the email message text to a specified email address.
This tutorial has shown how two independent Tasks with different starting conditions (Triggers) can be configured to interact in a meaningful manner. Although there is no direct connection, one Task relies on data supplied by the other one.
Questions?
If you have any questions, please do not hesitate to contact our support team.