
Automation Workshop can easily automate everyday tasks without using any additional software. You do not need Microsoft Word, Outlook or GMail, to send mail merge emails in an automated fashion.
Overview
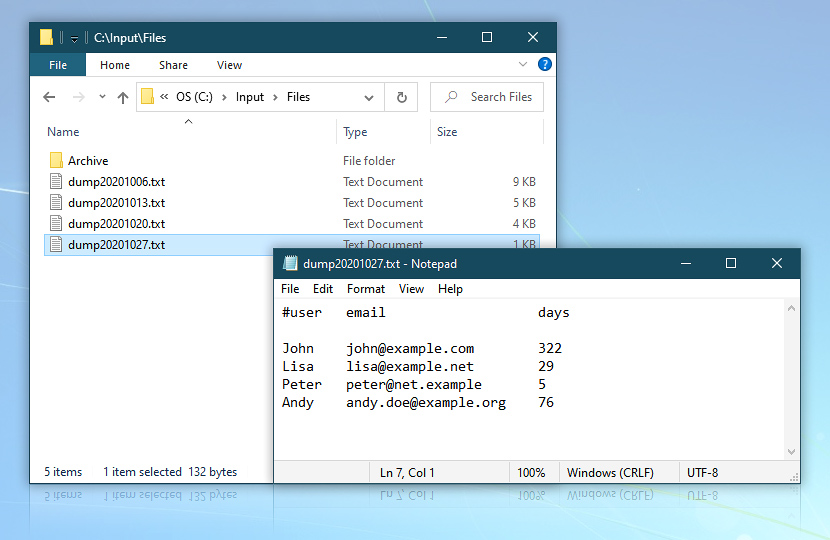
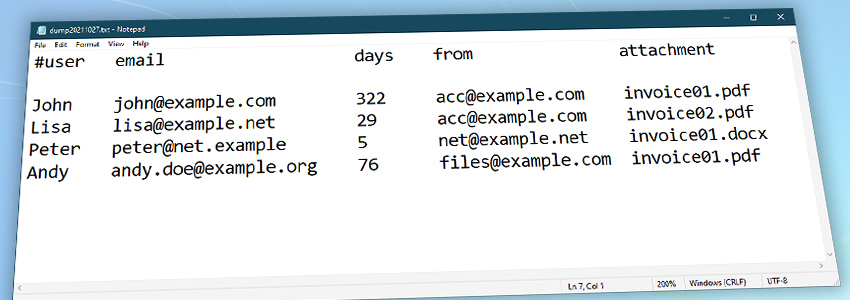
Let's imagine a legacy database that automatically exports user subscription information on a weekly basis. Each line of the exported file contains a person's name, email address and remaining subscription days.
The values are separated by a tab character. The user subscription data is exported in the C:\Input\Files\ folder to a text file, whose name starts with the word dump followed by the export date.
About tab separated .txt files
Any database can export data to a tab separated file. It is a plain text file where every column is split by a tab character. Such files are very flexible and universal. They also can be easily exported from Microsoft Excel using Save as type · Text (Tab delimited *.txt) feature.
Automation Workshop supports any textual data format. If you choose to use a .csv file, then simply choose a comma instead of tab character in the step that uses the Split Text Action.
Goal
The goal of this tutorial is to show how to create a mail merge task that can send email messages fully unattended. Everything happens fully automatically—a personalized message is sent to the each address of the mailing list that is exported from your DB.
In this tutorial we will email subscription reminders to the users whose membership expiration date is due within a month. But as you will see, each of the steps can be adjusted to do a much more—send individual attachments, send each email from a different FROM address, etc.
Solution
We will set up the File & Folder Watcher Trigger to monitor a folder where the file with user subscription data is exported, in anticipation for a weekly dump file. Then add the following actions to the task.
- A Read From File Action loads the text data into the task.
- A For Each loop which will process one line of the exported file at a time.
- The Split Text Action to retrieve tab-separated elements (user name, email, and remaining days of subscription) from every line.
- The If condition to check the remaining days for each user and, if less than 30, proceed with Send Email Action to send a reminder about subscription.
Create an automated task…
First, let's set up a trigger:
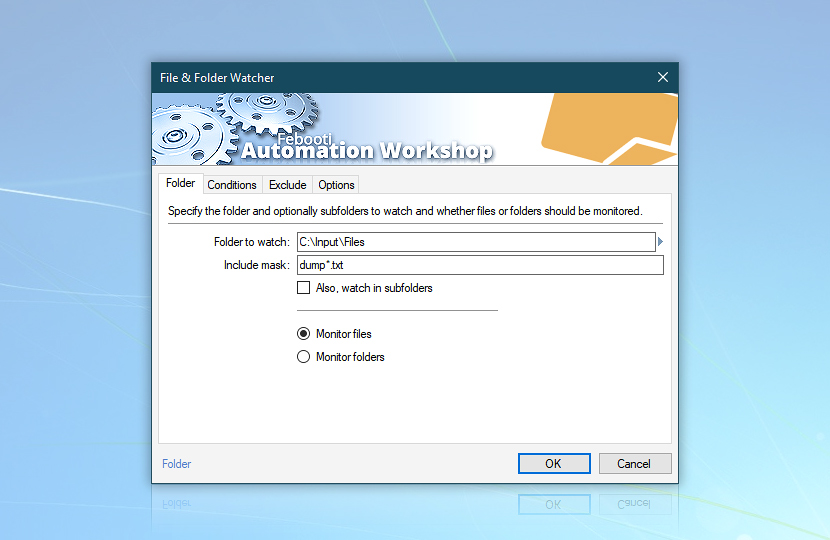
- add a File & Folder Watcher Trigger to monitor
C:\Input\Files\folder for new files; - to watch for files whose name begins with the word dump, type
dump*.txtin the Include mask field, so that no other files will trigger this Task · Learn file mask usage.
Set up mail merge Actions
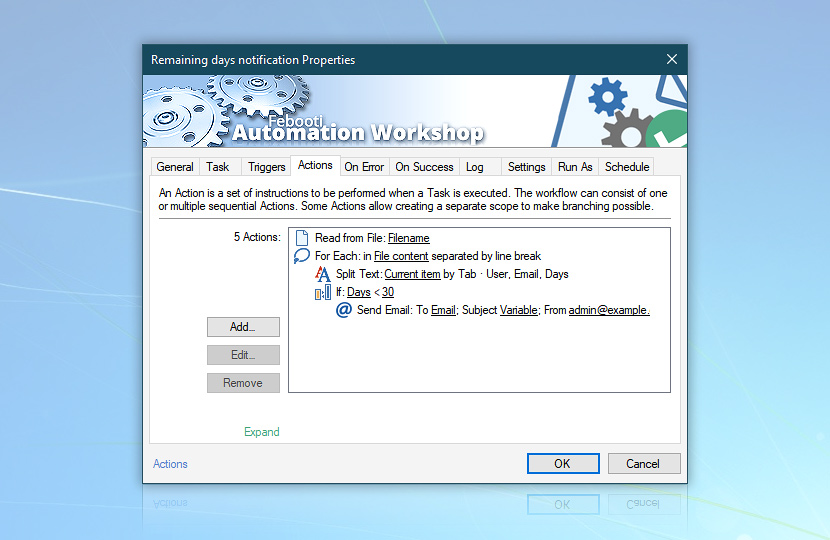
After the File & Folder Watcher Trigger is set to monitor for files with subscription data, let's set up the Actions for the Task.
These 5 actions will be launched step by step to achieve exactly the same effect as mail merge to send bulk email messages, but without using Microsoft Office.
Notice the indent for the Split Text and If Actions relative to the For Each Action. That means that in every step of For Each loop, i.e., every time the For Each Action retrieves a line from the text file, indented Actions are performed as well. The For Each loop will run as many steps as necessary to process every line in the text file.
Likewise, the indentation of the Send Email Action (relative to If Action) indicates that it is subordinate to the condition specified in If Action, rather than performed independently. Only when the condition in If Action is met (i.e., the number of remaining subscription days for a particular user is less than 30), the email reminder will be sent.
The information among Actions is passed by Variable Wizard—see the underlined elements in the Action tab and green, bold text in the parameter fields of all Actions.
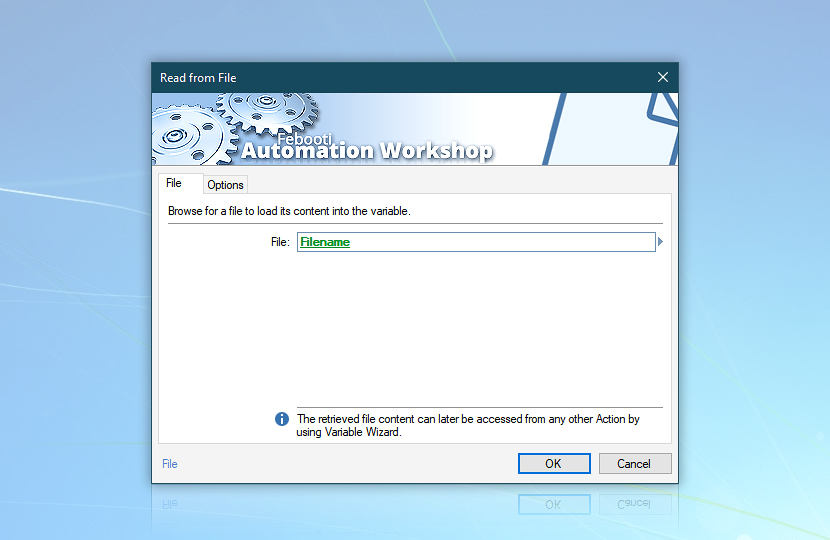
Read file
Let's use Read From File Action to read contents of the monitored file as soon as the File & Folder Watcher trigger detects a new dump file in the specified folder.
Loop content
Now, let's use For Each loop to process file contents line by line. Access the file content using Variable Wizard & Read From File variable. Set the For Each action to separate File content into lines by using Line break separator.
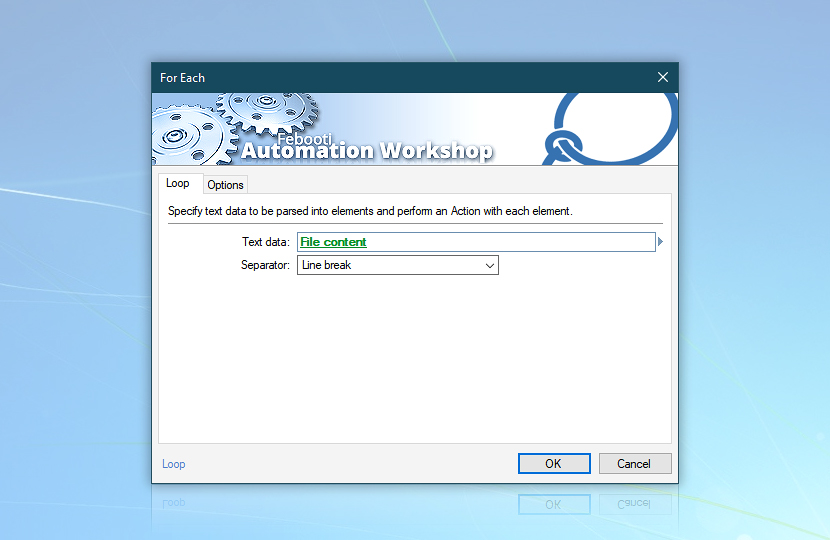
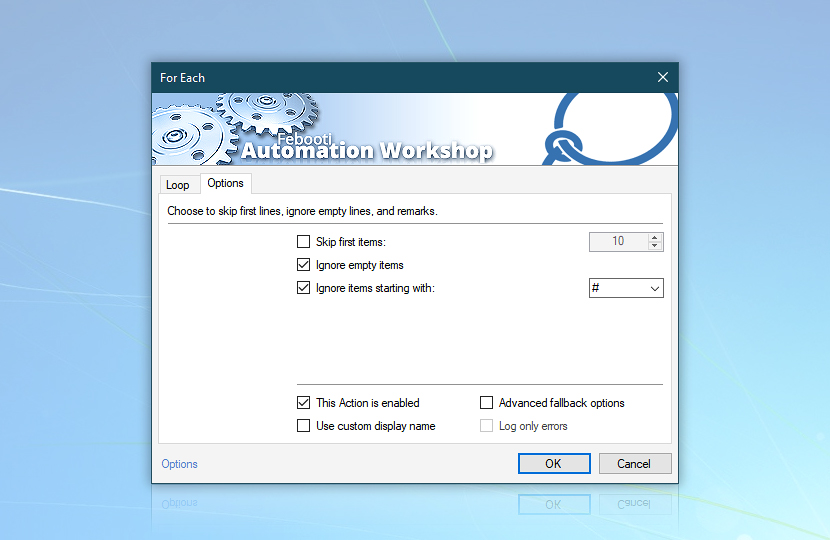
In For Each options specify to ignore empty lines and lines starting with # character (in this example, the header row).
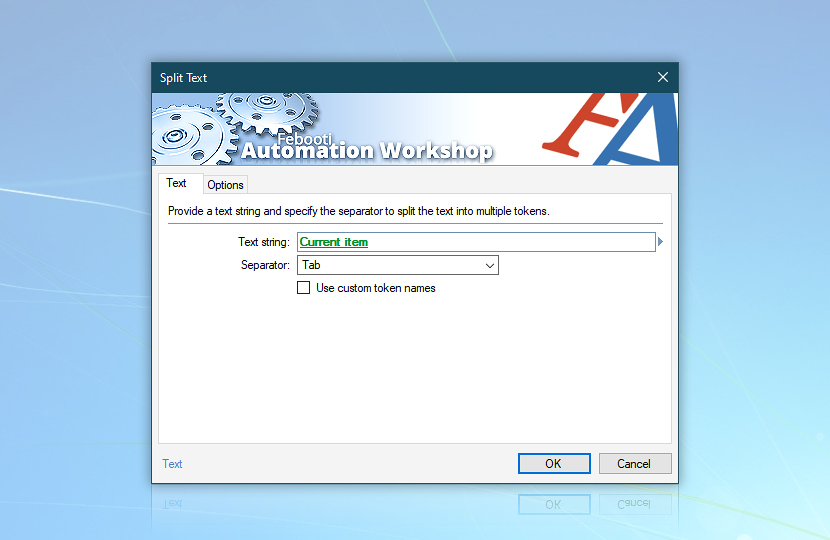
Split & tokenize values
Now let's configure the Split Text Action to split our tab separated columns into values. As an input value use the current item (in our case—the line we have just read) from the For Each loop (using Variable Wizard & For Each variable).
Set the tab separator character that delimits data columns in the text file. If you are using a .csv file, then choose a comma character.
We can make the Task simpler by assigning custom token names to each element, so that:
- the first text element in the line is the user from the first column;
- the second—email address;
- the third—remaining subscription days.
These custom names will now be available in Variable Wizard. Otherwise, the Variable Wizard will return generic names like Token 1, Token 2 and so on.
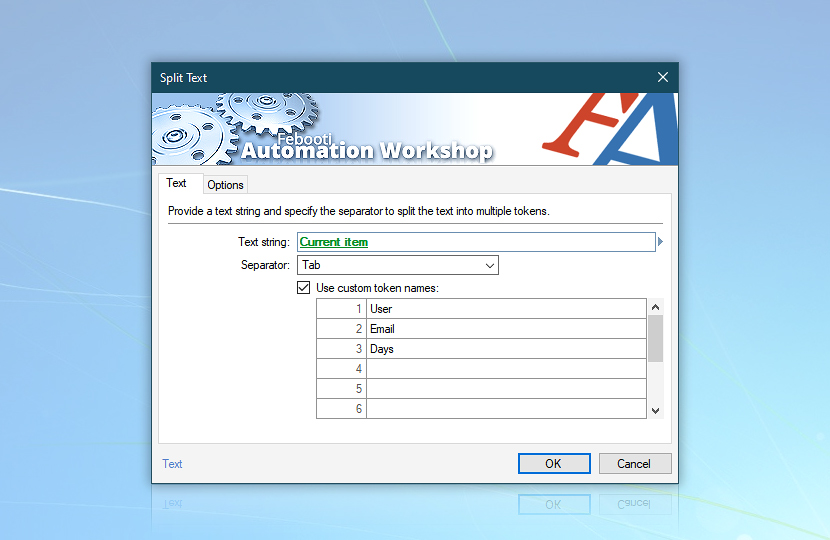
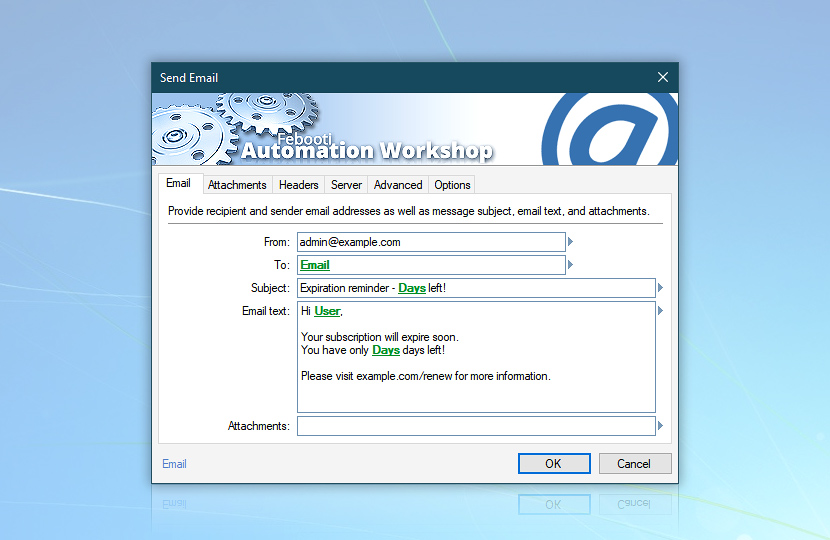
From now on the new variables will be available via Variable Wizard & Split Text variables. The User variable is assigned to text in the first column, the Email—to the second column, and the Days—to the third column.
Custom logic in mail merge
When the lines are separated into tokens, we will check each entry for remaining days of subscription. Let's compare if the Days variable is less than 30.

Send a mail merge message
Finally, let's add a Send Email Action which will notify a user of subscription expiration. Note how custom variables are elegantly merged in the email's TO, Subject, and Email text fields.
Download the ready-to-use demo task below. It can be imported into Automation Workshop with a few simple clicks.
Summary
The tutorial shows how to turn a simple text file report into automatic email reminders. The Task monitors for reports, processes them line by line while separating text strings into structured elements of data, analyses the remaining subscription and sends a reminder email, if need one.
The complete Task will consist of 1 Trigger and 5 Actions. The data is passed through the Task's multiple steps by using Variable Wizard. We have created a mail merge app without using Outlook or GMail.
Different From email address
How to send mail merge from a different email address? The steps described above can be altered to use a different email address for each of the email messages.
- Simply add another column in your
.txtor.csvfile. - Name the new field in the Split Text Action, for example, FromEmail.
- Use the FromEmail variable as a
fromfield in the Send Email Action.
Individual attachments
How do I send automatic emails with individual attachments? Each of the recipients can have different attachments sent by email. Alter the above steps to email mail merge with individual attachments:
- Add another column in your
.txtor.csvfile. - Fill the column with filenames, e.g.,
invoice01.pdf,invoice02.pdf, etc. - If you need to send two files, just add another column.
- Add a field in the Split Text Action. Name it Attachment.
- Use the Attachment variable as an attachment field in the Send Email Action.
Help at your fingertips…
If you have any questions, please do not hesitate to contact our support team.