
One of the strengths of Automation Workshop is the possibility to replace batch files and PowerShell scripts with automated Tasks. The Tasks can be launched by an automatic trigger or manually. Some examples:
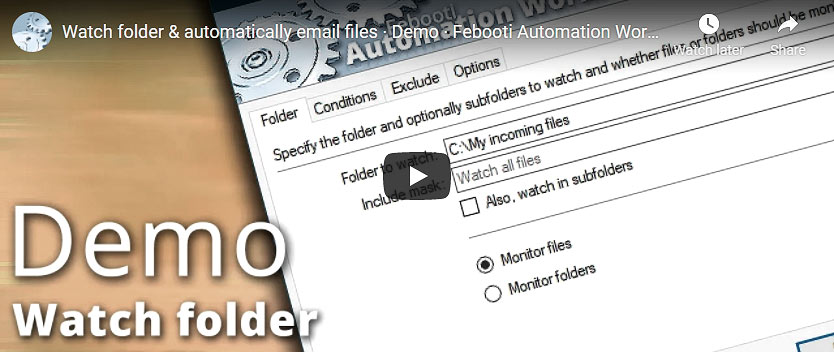
- trigger when a new file appears in a folder;
- trigger using Task Scheduler;
- start from a Desktop Shortcut.
The video demonstrates the power of the Automation Workshop application. Automated Tasks can be created in minutes using more than one hundred Actions. The flow of Actions defines what the Task does.
Overview
This tutorial will show you, in a step-by-step manner, how to create a Task to send emails with attachments. Let us suppose we want to:
- send all
.jpgimages from theC:\My Pictures\folder torecipient@example.com; - and move these image files to the
C:\Sent Pictures\folder.
Prepare…
What steps do we need to take to create a Task? Let us see what steps are necessary to create a Task that will send all .jpg images over email.
- First, we will need to create a new Task in the Task Wizard.
- We will be launching this Task manually, and I will cover how to start Tasks automatically later in this tutorial. So, currently, do not add any Triggers to this Task.
- Second, we have to add and configure an Action that will send images as email attachments.
- Finally, we will need to add an Action that will move image files from the
C:\My Pictures\folder to theC:\Sent Pictures\folder.
Create a Task
How to create a Task? First, you will need to create a new Task.
- Open the Automation Workshop Manager and choose New Task…
- The Task Wizard will open. Click Next after reading the Welcome screen.
- We will start this Task from a Desktop Shortcut, so skip the Triggers tab by clicking Next.
- Now we are in the Actions tab.
How to add and configure an Action that will send emails with attachments? Adding Actions is easy.
- Once in the Actions tab, click the Add button. The list of all available Actions will open in a new Add Actions window.
- Since we need an Action that sends emails, let us click on the Email category and choose the Send Email Action. When selected, click OK to start configuring the Send Email Action.
When configuring the Send Email Action, you will have to provide the same basic data as when using any other email client. Namely, to specify:
- sender's and recipient's email addresses;
- email subject field as well as email body text;
- fields From, To and Subject.
Attachments
How to add an attachment? Now that you have specified the sender's address, recipient, and subject text, let us see how to add an attachment.
- Click the mouse on the Attachments input line to place the cursor in it.
- Additional buttons will be shown, namely, the Browse button and the Variable Wizard button.
- Click the Browse button, then go to
C:\My Pictures\and choose any.jpgfile.
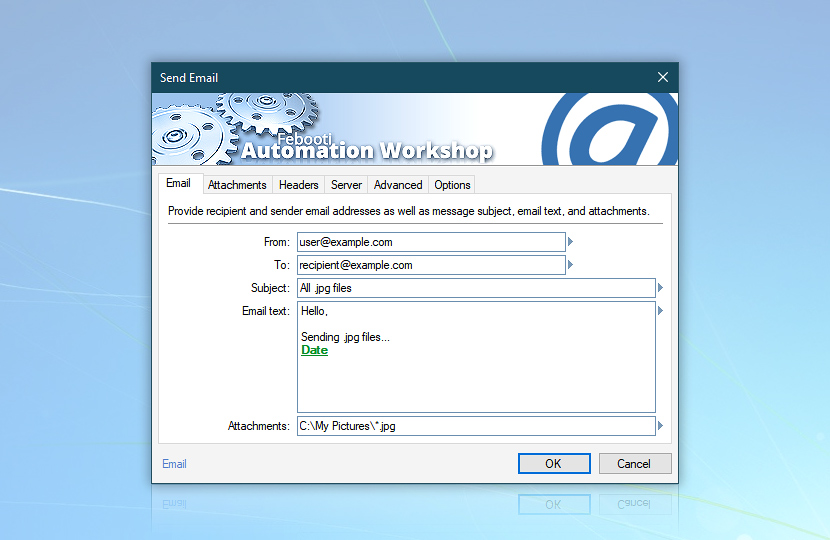
How to add all .jpg files as attachments? The Attachment line will show the path and file name (e.g., something like this: C:\My Pictures\). If we leave it as it is, each time the email is sent, Send Email Action will try to attach exactly this image, namely, Sunset.jpg.
However, we need to attach all image files. That is why we need to replace the file name (i.e., Sunset.jpg) with a file mask *.jpg (all jpg files), so that the Attachments field contains C:\My Pictures\ (instead of the initial C:\My Pictures\).
If the default email server is configured correctly, the configuration of the Send Email Action for the Task at hand is finished. Note that it is possible to specify a different SMTP server for each instance of the Send Email Action.
Click OK to confirm all changes we have made for the Send Email Action, and we are back in the Actions tab of the Task Wizard where we can add another Action.
Move files
How to add and configure an Action that will move files to another folder? Most likely, when sending email with JPEG images, there is no reason to send the same images to the same email address repeatedly. To avoid that, we can add an Action that will move all JPEG files from the C:\My Pictures\ folder to the C:\Sent Pictures\ folder after the email is sent.
Since we are still in the Actions tab of the Task Wizard, let us click the Add button again. This time we need to perform file operations, so we:
- open File & Folder category;
- select Move File Action;
- and click OK to open its properties.
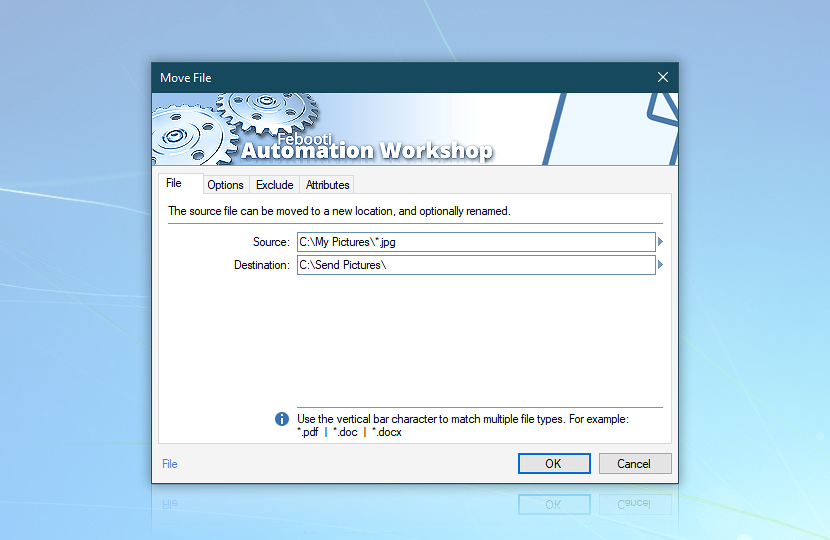
Move File Action allows moving one or multiple files from one location to another. First, we need to fill the Source field—which files are to be moved. Similarly to how we configured the Send Email Action, in the Source field, specify C:\My Pictures\ (meaning, all jpg files in the C:\My Pictures\ folder).
Now, let us click the Destination input line and select the C:\Sent Pictures\ folder as the destination. The configuration of the Move File Action is completed. Click OK to return to the Task Wizard and complete a few remaining steps (give the Task a name, choose reports options, etc.).
The Task is ready! Since it has no Triggers, it will not start automatically. Every time you execute the Task manually, it will attach all .jpg files currently in the C:\My Pictures\ folder to an email and send it to the specified email address.
After finishing with email sending, the Task will continue with the Move File Action, which will move all .jpg images from the C:\My Pictures\ folder to the C:\Sent Pictures\ folder, to avoid sending the same images again upon the next Task execution.
Start the Task?
How can I start the Task? Both automatic and manual Tasks can be executed manually, however, automatic Tasks frequently depend on variable data from their Triggers. To diminish accidental launches, Run Task is not the default option when double-clicking on a Task (instead, it will open Task Properties).
To run the Task manually, you will have to select the Task in the Task Pane of Automation Workshop Manager and use one of the following methods:
- Create a Desktop Shortcut for the Task, and launch it from your Desktop.
- Click the Run button on the Task toolbar.
- Press CTRL+F5 keyboard shortcut.
Summary
We have created a Task that does not contain any automatic Triggers and, as a consequence, can be executed only manually. When executed, the Task will locate all .jpg image files in the C:\My Pictures\ folder and attach them to an email. After sending the email with attached images, the Task will move the image files to the C:\Sent Pictures\ folder.
Send email automatically
Instead of running Tasks manually, add a Trigger to start the Task automatically. There are many ways to start a Task without any human interaction. The email with attachments will be sent even when no one is in front of a computer.
The built-in Task Scheduler Trigger works similarly to the Windows Task Scheduler. It starts a Task at predefined times. Task Scheduler is useful when you want your emails to be sent every hour, once a day, on Mondays, etc.
The File & Folder Watcher Trigger allows sending emails when a new file appears in a folder. It allows attaching files that triggered the Task. See it in action: How do I automatically email files in a folder?
Other ways to start a Task:
- API
- Run Task from a batch file
- Start Task from the Desktop
- On User Logon
- On an event from an FTP server
Configure SMTP server
To send email, Automation Workshop needs an outgoing mail server. The SMTP protocol is the industry standard for email sending. The SMTP mail server can be configured in the Server tab or in the Automation Workshop Options.
If you do not know the server name, port, and other parameters, copy them from your favorite email application. To test and debug the connection to the server, follow this troubleshooter.
Still have a question?
If you have any questions, please do not hesitate to contact our support team.