
This tutorial will show how to monitor a folder for incoming files and move them automatically to a folder with the current date in its name.
Overview
Suppose that at the end of every working day, all employees are uploading their daily reports to a network share. Automation Workshop supports UNC paths and mapped drives, but for the simplicity of the example, we will use the path C:\Report\ on a local computer.
Upon arrival to the share, these documents are to be moved to the D:\Backup\ folder where they need to be retrievable later by the date of their backup. Let us list the necessary steps:
- The creation of the Task itself.
- Adding a Trigger which will watch the folder
C:\Reports\for new files. - Adding an Action which will copy the newly arrived file to the backup folder containing the current date in its name.
Create a Task
How to create a Task in Automation Workshop? Creating a Task is easy. Just open the Automation Workshop Manager and choose New Task from the File menu. This will bring forward the Task Wizard—a step-by-step configuration tool for setting up the Task parameters (including adding and configuring both Triggers and Actions).
Monitor a folder
How to watch a folder for new files? In the Task Wizard, go to the Trigger tab and click the Add button (this will open the Add Trigger window). Select the File & Folder Watcher and click OK. We are automatically brought to the File & Folder Watcher Folder properties where we can configure the conditions upon which the Trigger will execute the Task.
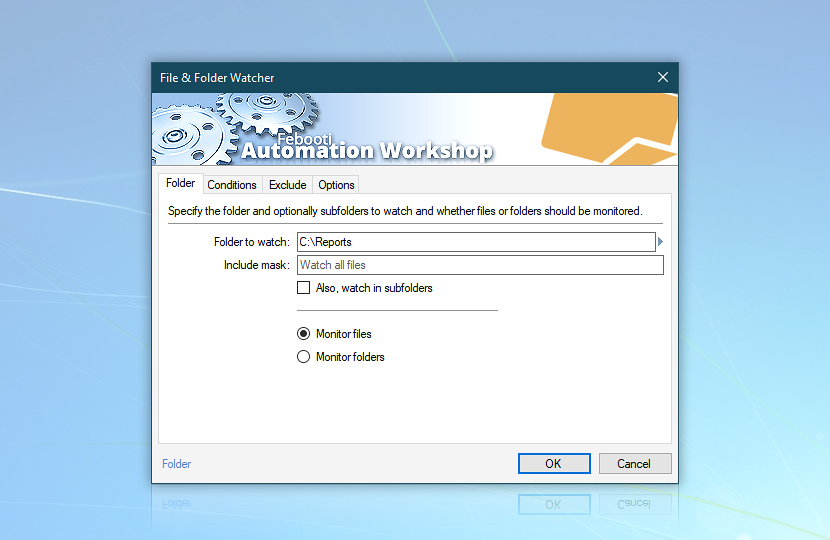
First, we need to specify which folder will be monitored. Click on the Folder to watch input line and then on the Browse button on the right side of it. Select the Reports folder on drive C: and click OK. Now the Folder to watch input line contains C:\Reports. All other settings suit our Task by default.
The newly added File & Folder Watcher will monitor for all new files appearing in the C:\Reports folder without filtering out any files. Just click OK at this point to save the Trigger settings and return to the Task Wizard.
Move files
How to automatically move files to a backup folder? Now we have to add an Action that will move files when triggered. Go to the Actions tab of the Task Wizard (the next step after the Triggers section) and click the Add button (this will open the Add Action window). Choose the Move File Action from the File & Folder category and click OK.
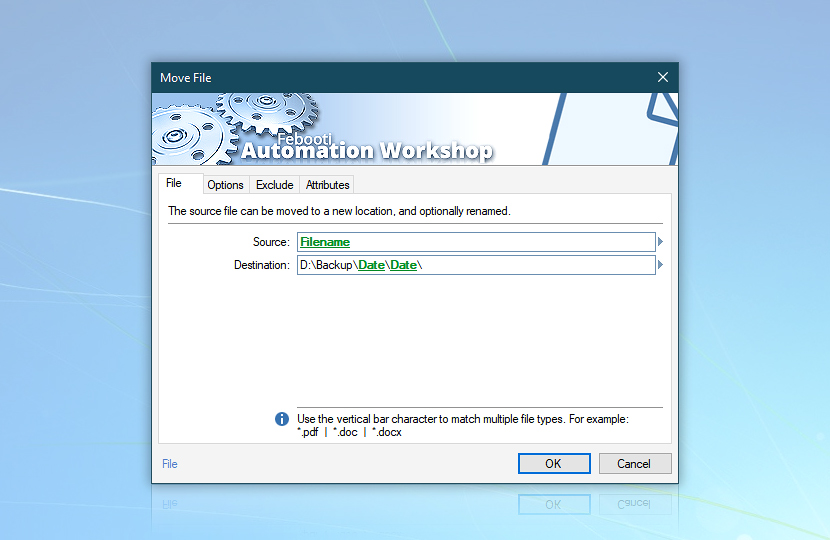
Now we are in the File tab of the Move File Action properties. Here we have to specify the most important settings, namely, what will be moved (source) and to where exactly (destination).
Let us start with the source. We will not specify the Move File Action to move just some files located in some folder. Instead, we will move exactly those files that are found by the File & Folder Watcher (added in the previous step).
Click on the Variable Wizard button (to the right from the Source input line). The list of Variable categories will be opened. We need to take parameters from a Trigger, so we click on the Triggers category and choose File & Folder Watcher: C:\Reports (watch for new files). The default option on the right side, namely, Full path and filename fits perfectly to specify both the path and filename for automatic moving operations. Click OK and see Filename in the Source input line.
Now let us specify the destination. We need not only to move all files to the folder D:\Backup\, but also to create a subfolder for each day. First, let us click on the Destination input line and then on the Browse button. Select the Backup folder on drive D: and click OK, which will result in D:\Backup\ appearing in the Destination input line.
Folder dates
Now, how can we tell Automation Workshop to automatically put files into a folder that has the current date in its name? For such a varying parameter, we will need to use the Variable Wizard again. While the cursor is still in the Destination input line (after D:\Backup\), click on the Variable Wizard button.
Since we need to add the current date, let us choose the Date variable from the Date & Time category. The default format is Month / Day / Year separated by slashes. However, for current purposes, this format is not appropriate, since we cannot have slashes in filenames. Dots in a filename specify extensions and can be used in principle. However, it is a much better idea to choose a dash as a file system neutral character.

Also, it will be more convenient to see all folders in sequential order when browsing the D:\Backup folder, that is why it is better to choose the Year ‐ Month ‐ Day format. Also, check the Add leading zero option to avoid problems with the sorting order between dates or months that contain a single digit and those with two digits (e.g., 1, 10, 11, 12, 2 vs. 01, 02, 10, 11, 12).
When configured, click OK and you will see D:\Backup\Date in the Destination input line. Finally, in order to specify that Date refers to a folder (and not to a filename), manually add a backslash character at the end of the Destination input line. The final content of the input line, thus, has to be: D:\Backup\Date\.

Unless you would like to filter out some files based on their names, extension, attributes, or time, click OK. The Move File Action is configured and the Task is ready to start the daily backups. Just check the reporting options, give the Task a name (in the Task tab), and click Finish to save the settings and activate the Task.
Example…
From now on, whenever a new file appears in the C:\Report\ folder, the File & Folder Watcher will automatically move it to a folder containing the current date in its name located in D:\Backup\ (if non-existent, the folder will be created during the automatic file moving operation). Let us consider the following scenario:
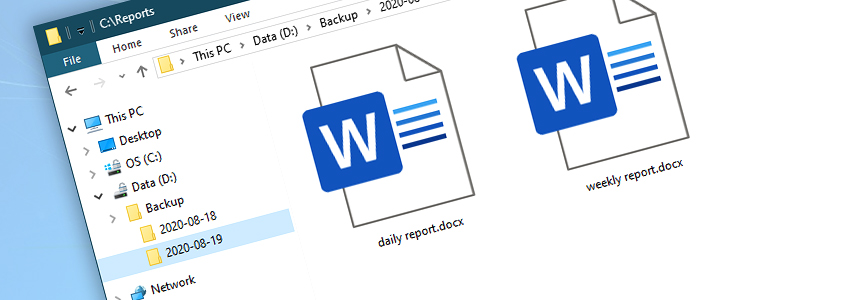
- On August 18th, 2020, the file
daily report.docxis put into theC:\Reports\folder. The file is removed fromC:\Reports\and put into a newly automatically created folder with the date in its name, which itself is located in theD:\Backup\folder. Now there is adaily report.docxfile in theD:\Backup\2020-08-18\folder. - On the same day (August 18th, 2020), a file named
weekly report.docxis put into theC:\Reports\folder. The file is removed fromC:\Reports\and put into the previously created folder with the date in its name located in theD:\Backup\folder. Now there are bothdaily report.docxandweekly report.docxfiles in theD:\Backup\2020-08-18\folder. - On the same day (August 18th, 2020), a file with the same name as the one already in today's backup (
weekly report.docx) is put into theC:\Reportsfolder. Since the Move File Action does not overwrite destination files by default, theweekly report.docxwill remain in theC:\Reports\folder. Theweekly report.docxfile already in today's backup folderD:\Backup\2020-08-18\will not be overwritten. A corresponding error message will be logged. Note: If the Overwrite destination files option is enabled in the Options tab of the Move File properties, theweekly report.docxfile already in theD:\Backup\2020-08-18\folder will be overwritten with the newweekly reports.docxfile which was put in theC:\Reports\folder more recently. - A file with the same name (
weekly report.docx) as the day before is put into theC:\Reportsfolder on the next day (August 19th, 2020). Since files are moved to a different backup folder each day, the file moving process will not be affected by the existence of the file with the same name in a different folder. In this case,weekly report.docxwill just be moved toD:\Backup\2020-08-19\without regard to the contents of theD:\Backup\2020-08-18\folder.
Hourly backups
How to set up hourly backup folders instead of daily ones? If we wanted to create a backup archive on an hourly basis instead of a daily one, we would need to add an hour value to the destination folder specification.
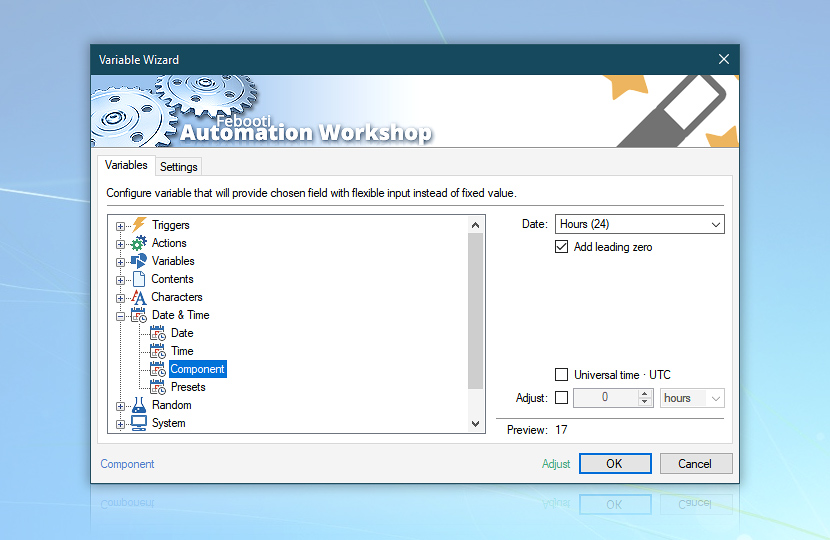
To modify the already existing setup, go to the File tab of the Move File Action properties, put a cursor at the end of the Destination input line, just after D:\Backup\Date\, and click on the Variable Wizard button. Choose Component from the Date & Time category.
Select Hours (24) on the right side. The hour value is chosen in a 24-hour format to enable easier folder sorting afterward. Click OK to return to the File tab of the Move File Action. Add a backslash character after D:\Backup\Date\Date to specify that the destination will be a folder, not a file. The final content of the Destination input line, thus, will be: D:\Backup\Date\Date\.
With this setup, the backup folder of each day will contain subfolders with the hour number in their names. Or, the other way around, an hour subfolder will be created for each hour when a file is moved from C:\Reports\ to the backup folder.
For example, if some files are moved on August 18th, 2020 at the following times 10:12AM, 1:27PM, and 3:59PM, the respective subfolders 10, 13, and 15 are created in the D:\Backup\2020-08-18 folder.

Alternatively, instead of using the D:\Backup\Date\Date\ destination, it is possible to specify the D:\Backup\Date-Date\ folder as the Destination. As a consequence, there will be no hourly subfolders for each date, but hourly folders containing Year-Month-Day-Hour in their names (e.g., D:\Backup\2010-07-15-10\).
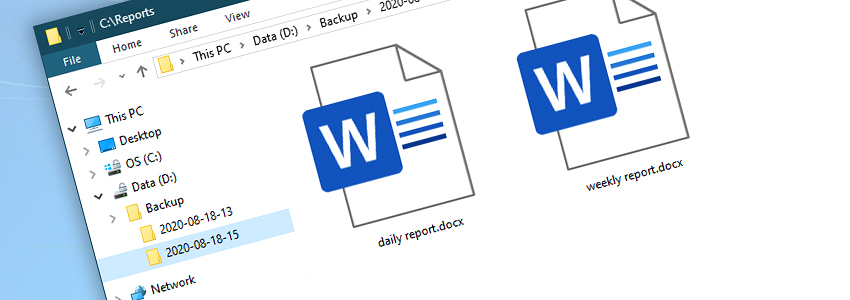
In this case, if some files are moved on August 18th, 2020 at the following times 10:12AM, 1:27PM, and 3:59PM, the 2020-08-18-10, 2020-08-18-13, and 2020-08-18-15 respective folders are created in the D:\Backup folder.
Assistance is here…
If you have any questions, please do not hesitate to contact our support team.