
The final section enables sending emails through Automation Workshop with Microsoft OAuth authentication. Both preceding configuration steps must be completed to ensure proper functionality of the email delivery system:
- Part 1 · Create Microsoft OAuth credentials
- Part 2 · Finalize Microsoft OAuth credentials using PowerShell
- Part 3 · Send first email using Microsoft OAuth credentials · (you are here)
With OAuth configured, Automation Workshop can now securely send emails, ensuring a reliable and authenticated email workflow.
Keep your Automation Workshop up-to-date to enjoy seamless integration with Microsoft email services. Regular updates ensure you benefit from the latest compatibility improvements as Microsoft continues to evolve their diverse email server configurations. This helps maintain reliable connections even as Microsoft's infrastructure changes over time.
OAuth credential…
Now that the app is configured and all Microsoft-side permissions are in place, it is time to bring the credentials into Automation Workshop. This step connects everything you have done so far—your Entra app, service principal, mailbox permissions—and turns it into a working OAuth 2.0 identity ready to send emails.
Create
To begin, open the API Keys & Credentials manager from the Automation Workshop Tools menu, activate the OAuth view and choose New Credential.
This launches the OAuth credential Wizard where you enter the Application (client) ID and the Client secret you saved earlier. These fields correspond directly to the app registration in Entra. Make sure the Unattended service account flow option is selected (with the Microsoft compatible option), as this tutorial sets up a service-only configuration (not user-bound or interactive).
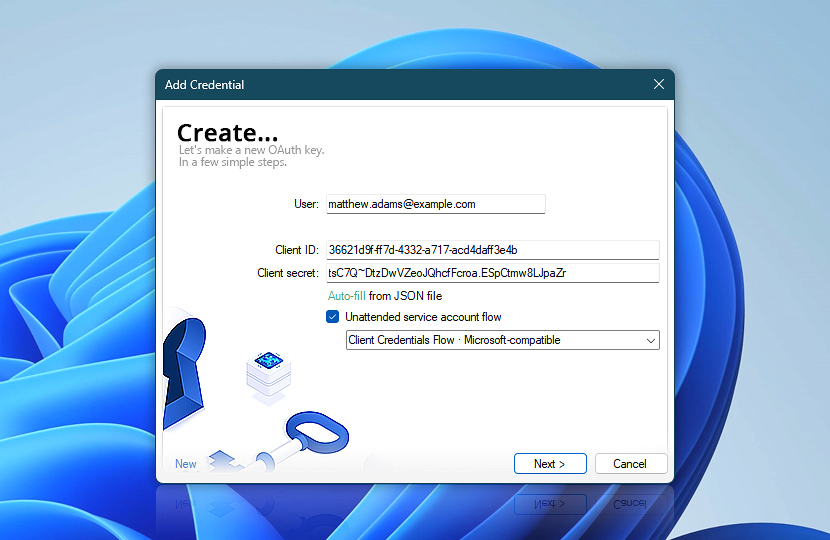
Automation Workshop uses these credentials to authenticate securely with Microsoft 365 using the Client Credentials Flow, which does not require user interaction or consent prompts.
Flow
In this step, you need to select the appropriate OAuth provider. Since we are configuring access for a specific Microsoft Entra tenant, you can choose Microsoft tenant from the list.
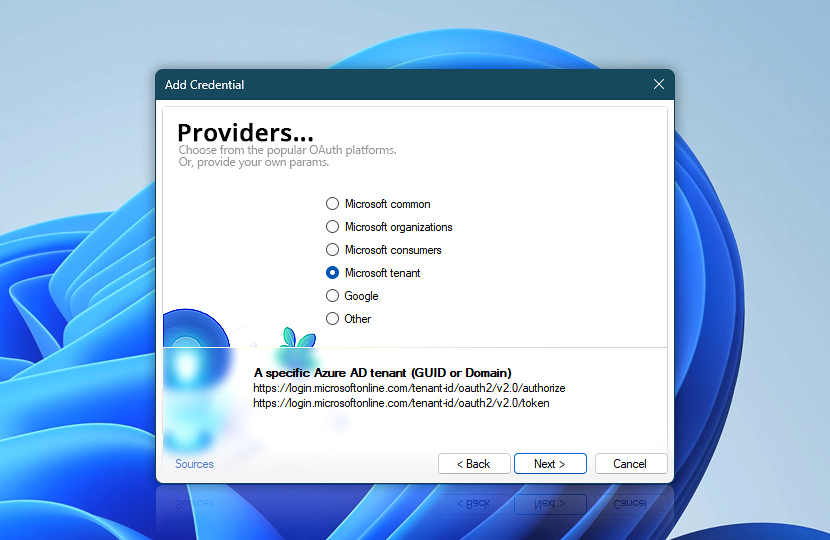
This automatically fills in the token endpoint and scope, but you will still need to replace the tenant-id placeholder with your actual Directory (tenant) ID—copied earlier during the Entra app setup. Or you can simply copy the complete endpoint URL you have in your text editor from the previous steps.
You do not need to fill in the Authorization endpoint for Client Credentials Flow, so it will be left empty or disabled, as it is not used in the headless mode.
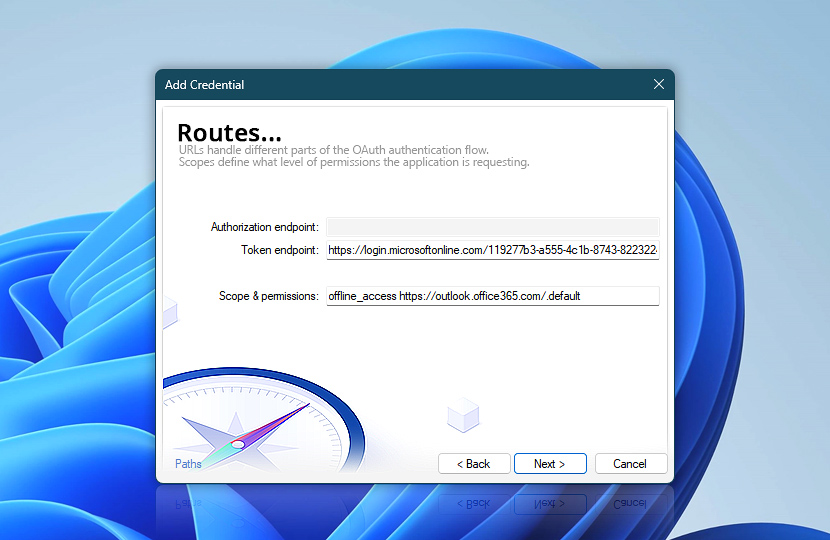
In the Scope & permissions field, you will see a list of scopes. These define the level of access your credential is requesting from Microsoft's services:
offline_accessallows Automation Workshop to obtain a refresh token, so it can stay authorized long-term without requiring repeated sign-ins.https://tells Microsoft to use the default permissions that have been granted to the app in Entra (via API permissions). In our case, it includes theoutlook.office365.com/ .default SMTP.SendAsApppermission we configured earlier.
You can customize scopes here if needed, but the defaults are usually appropriate for sending email using OAuth 2.0. Once confirmed, you are ready to continue to the next step.
Complete
In the final step of the OAuth credential Wizard, you will be asked to give your credential a name and an optional description. This is entirely for your convenience—it helps you identify the credential later when managing multiple OAuth keys.
Choose a meaningful name that reflects its purpose, such as MS OAuth Headless, and optionally include a description like Microsoft Entra email service to make it even clearer.
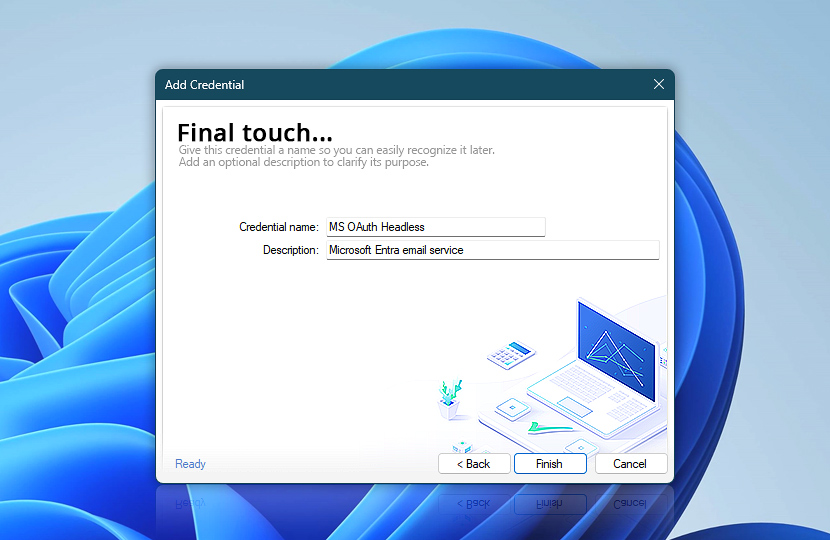
Once everything looks good, hit Finish to complete the credential setup. The credential is now ready for use in your email sending tasks.
Configure email…
Now that the OAuth 2.0 credential has been successfully created, you are ready to send your first test email using Automation Workshop. Create a new Task, and add a Send Email Action to your workflow.
Message setup
In the Send Email Action, begin by filling in the essential message fields. In the Email tab, enter the From address. This must match the Microsoft 365 user mailbox that was granted access earlier in the PowerShell step (tutorial).
Provide a To address, which can be any valid email—your own, a test inbox, or a colleague's address. Then, type in a Subject and some sample Email text for the body.
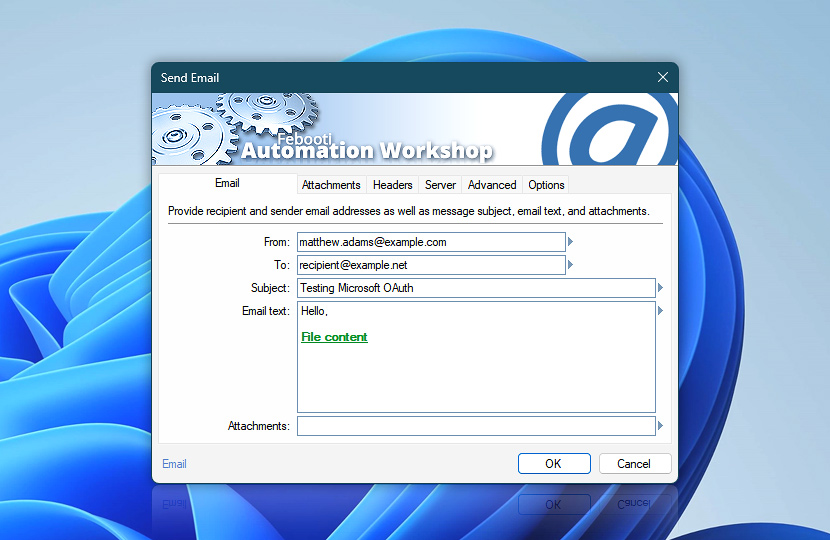
These fields define the message content. For testing purposes, a simple Hello message is enough, but you can try some dynamic content techniques by using Variable Wizard (such as Date variables).
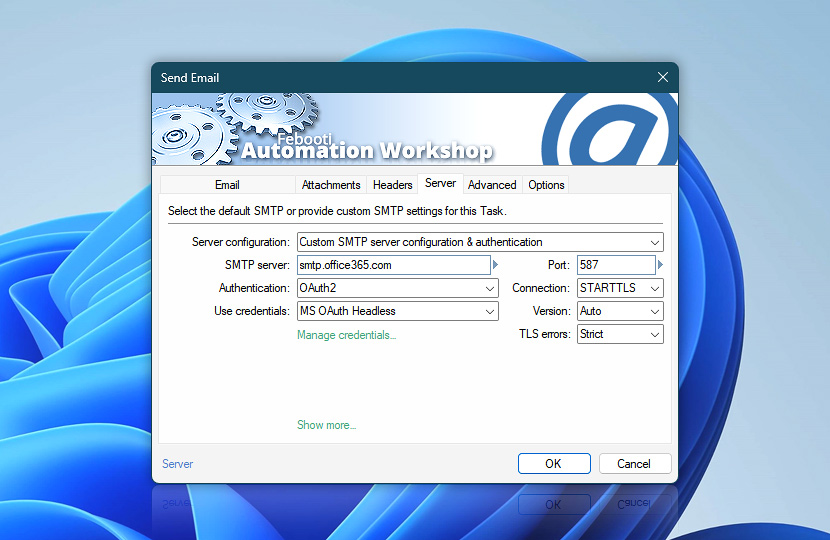
SMTP & OAuth
Next, switch to the Server tab of the Send Email Action. This is where you configure how the email is actually sent.
Set the Server configuration to Custom SMTP server configuration & authentication. For the SMTP server, enter smtp.office365.com—this is Microsoft's SMTP server for Microsoft 365 accounts.
For Authentication, select OAuth2. This unlocks the secure and modern authentication flow that does not require storing user passwords.
From the Use credentials dropdown, choose the credential you created earlier in the tutorial—here, it is labeled MS OAuth Headless. This credential includes everything needed to authorize the connection securely.
Once everything is configured, click OK to add the Send Email Action to your workflow. If you are using the Task Wizard, just hit Next and Finish to complete Task creation. You are now ready to run the Task and send your first OAuth-authenticated email!
Done!
Once everything is set up, go ahead and click the Run button to execute the Task you have just created.
Automation Workshop will launch the Task and begin processing. Keep an eye on the Log Pane at the bottom of the window—this is where you will see real-time status messages. If everything is configured correctly, you will see a confirmation that the email was sent successfully.
You should soon receive the test message in your email inbox. If the Task was successful but no message appears, do not forget to check your junk or spam folder, especially if you are sending to yourself for testing purposes.
Your system is now fully set up to send secure emails using Microsoft SMTP via OAuth 2.0—congratulations!
Troubleshooting
In case the Task fails or returns a warning, the Log Pane will display detailed errors or warning messages. These messages are essential for identifying and resolving misconfigurations, such as invalid credentials, connectivity problems, or permission issues. They may contain responses from your SMTP server.
If you need deeper insights into what is happening under the hood, you can enable detailed SMTP logging. This will show the entire request/response communication between Automation Workshop and the SMTP server, which is incredibly helpful when troubleshooting hard-to-diagnose issues.
And finally, if your organization uses firewalls, proxy servers, or endpoint protection software that may block outbound SMTP connections, consult on how to diagnose and resolve outbound connection issues with SMTP servers.
Help at your fingertips…
If you have any questions, please do not hesitate to contact our support team.